Keycloak Configuration
This guide provides specific configuration details for using Keycloak as your Identity Provider with the User Tasks Bridge Backend.
Setting Up Keycloak as Identity Provider for User Tasks Bridge Backend
-
The very first thing you want to do is log into your Keycloak Admin panel using your admin credentials
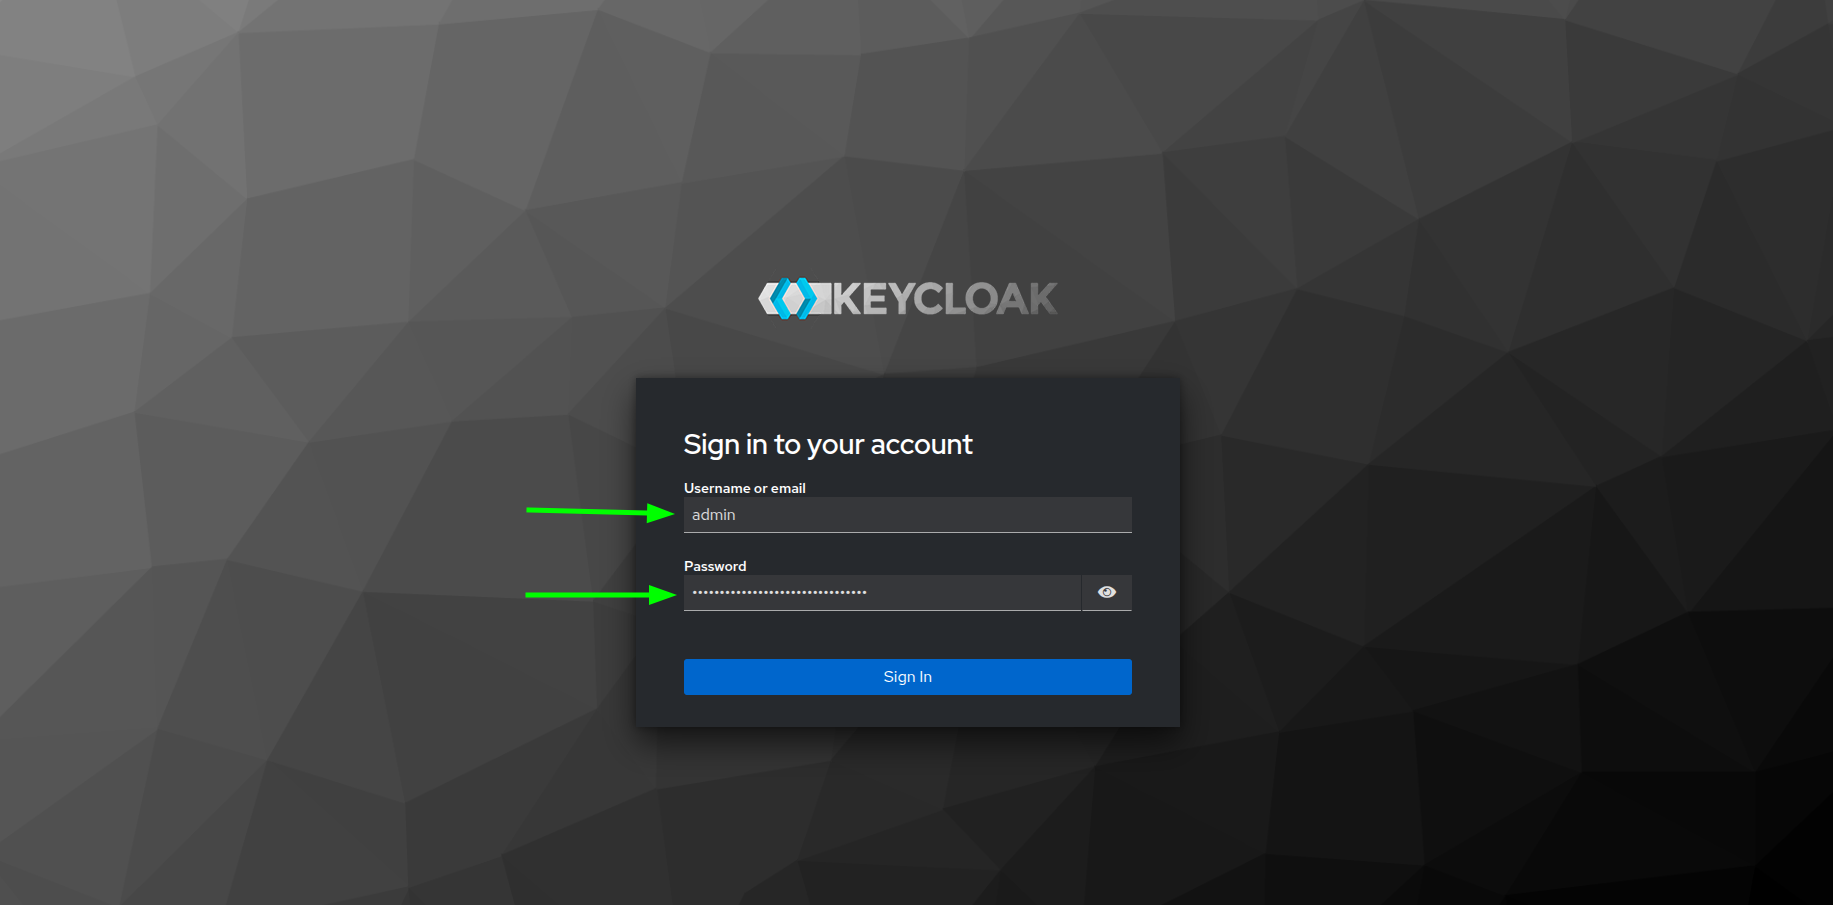
Keycloak login with Admin credentials -
After successfully logging in, you can use your already existing realm and Keycloak client(s), in which case, you can skip all the steps all the way until here, else, let's quickly go through Realm creation.
Realm Creation
In Keycloak, the term Realm refers to the highest-level organizational unit that acts as an isolated authentication and authorization domain. Each realm manages its own users, roles, groups, and clients, ensuring complete separation from other realms. This allows organizations to support multi-tenancy by having different realms for different applications or business units while keeping configurations independent.
In order to create a Realm in Keycloak, you have to follow the next steps:
- Locate the top-left selector where you might have at least one existing realm.
- Click on the arrow icon.
- Click on the Create realm button.
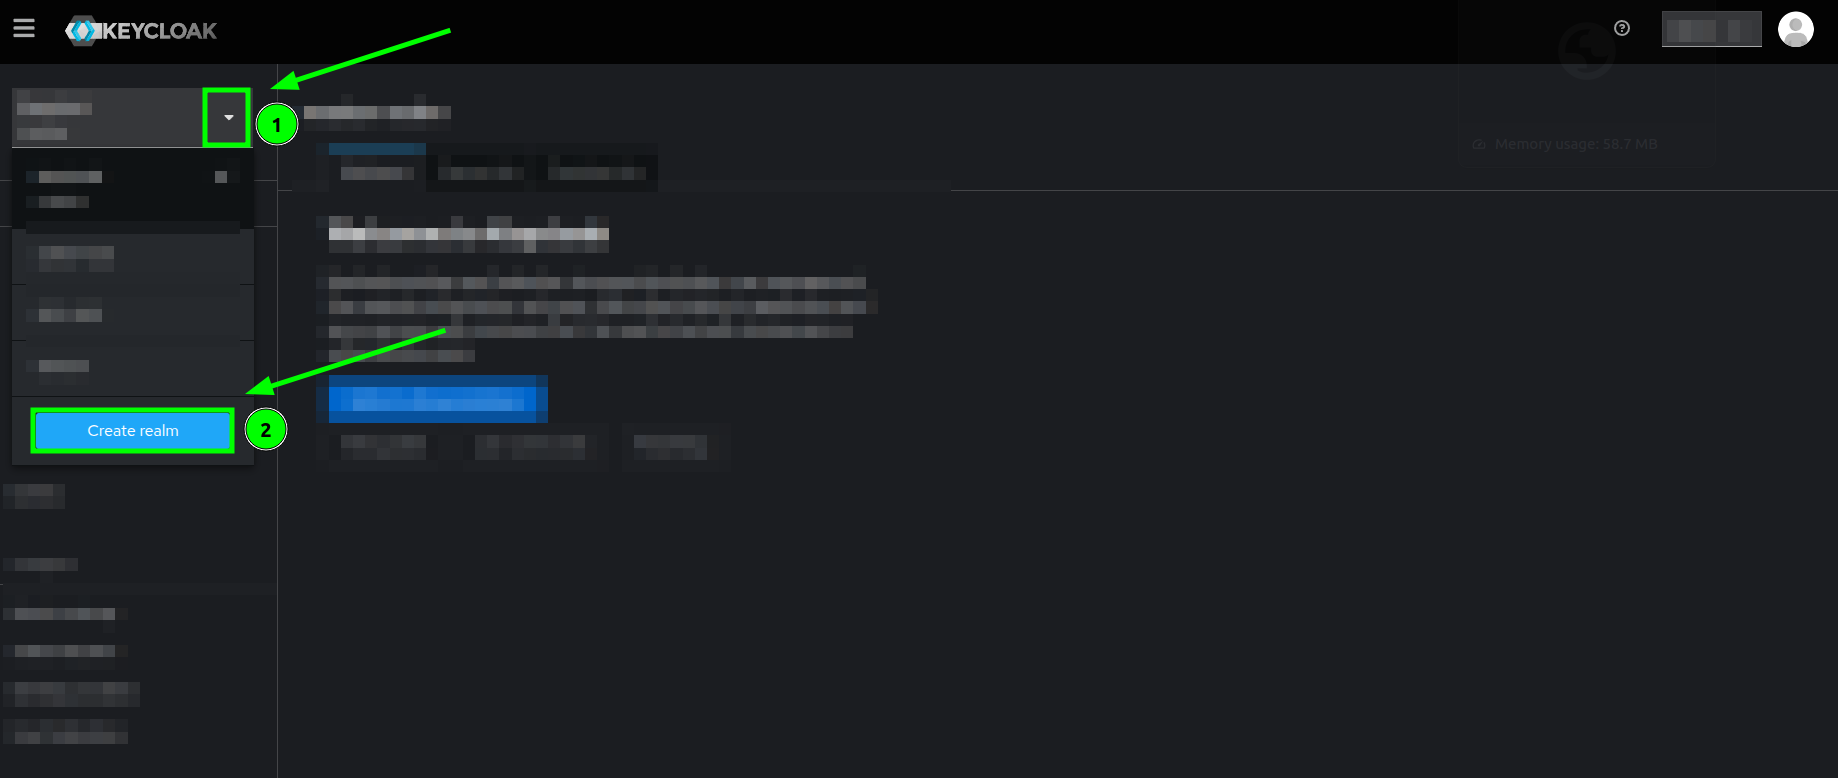
Keycloak's welcome page highlighting the Create realm button - You will see a little form where the only mandatory field is
Realm name, fill in theRealm nameand make sure that theEnabledswitch is turned on. - Click on the Create button.
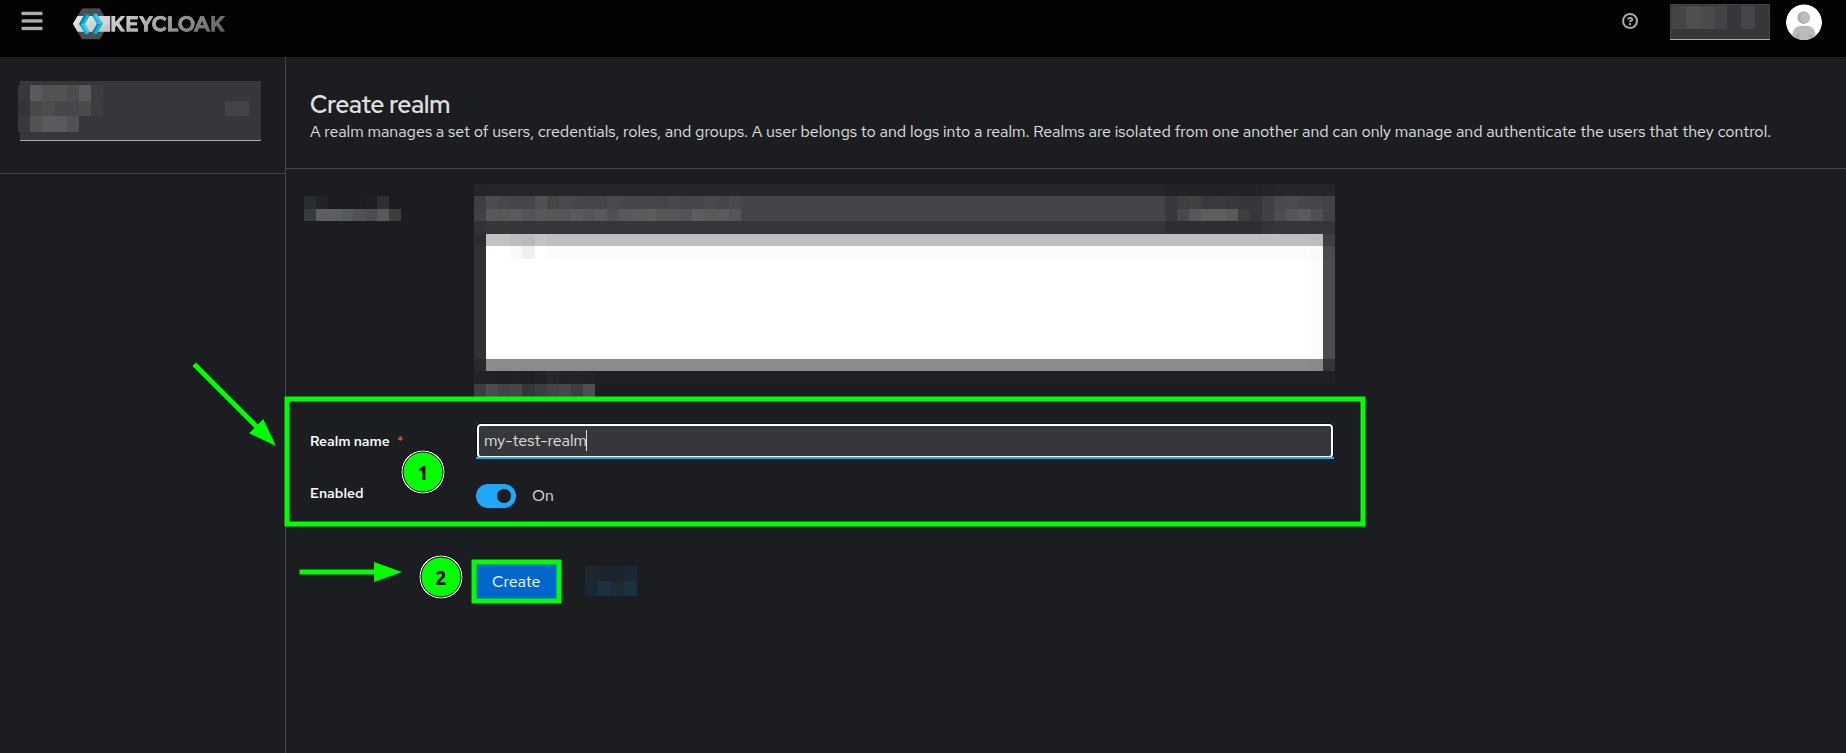
Create realm form highlighting the required fields and creation button - After successfully creating your realm, you should be redirected to the welcome page and your realm name should appear on the top-left selector.
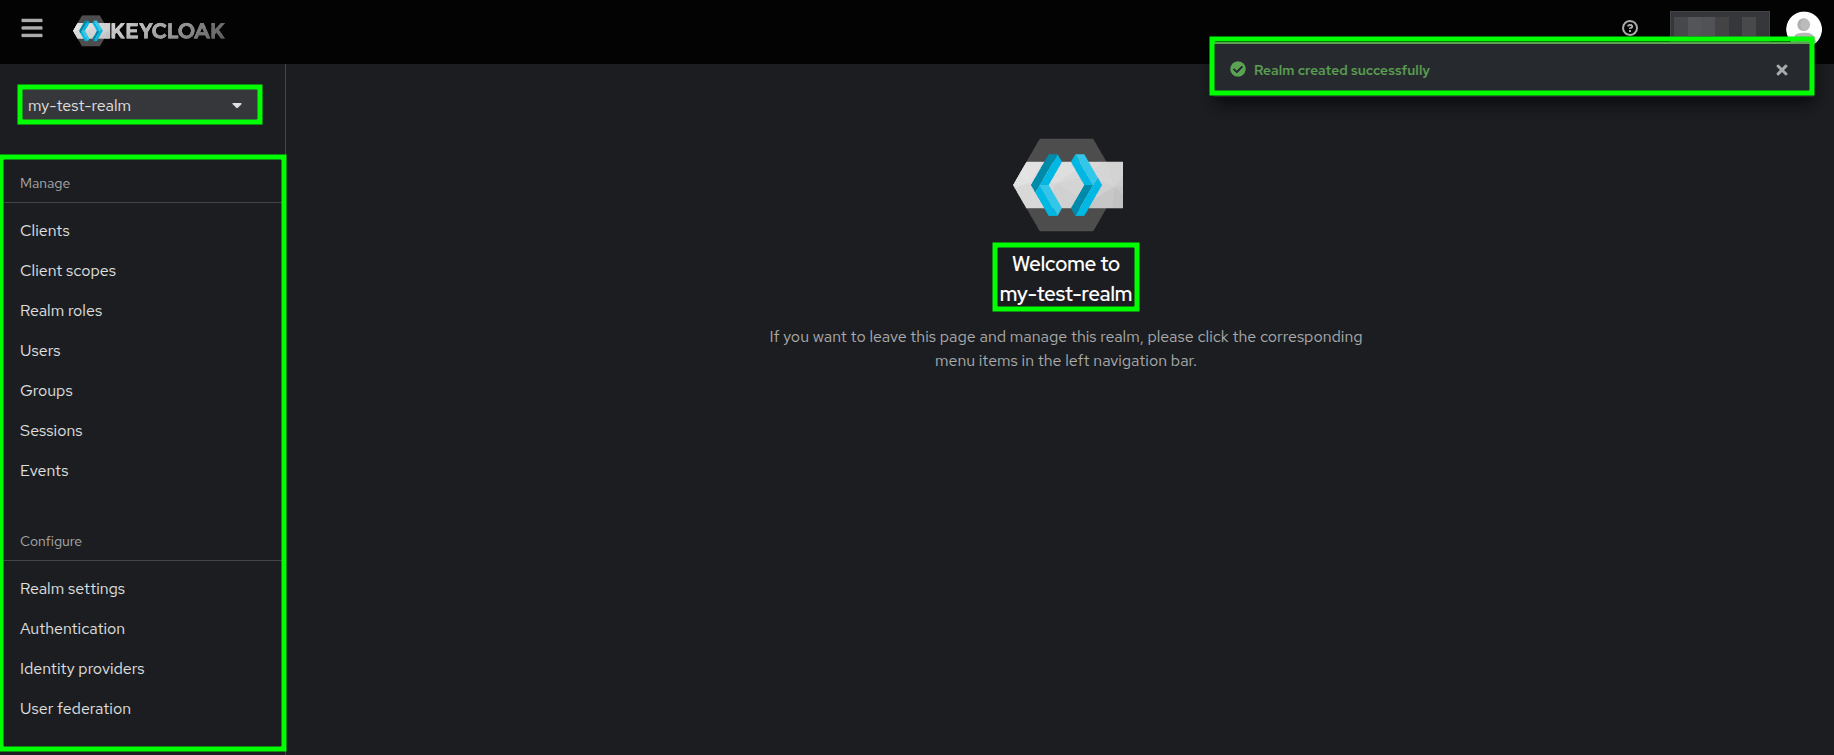
Keycloak's welcome page after successfully creating a realm - An as easy as that, you have created a Realm in Keycloak!
Now, you need to create a client within your recently created realm.
Client Creation
Keycloak's docs define the Clients as entities that can request authentication of a user. It also says that there are two types of Clients. The first one is an application that wants to participate in single sign-on, for those clients just want Keycloak to provide security for them. The other type is one that is requesting an access token so that it can invoke other services on behalf of the authenticated user.
In order to create a Client in Keycloak, you have to follow the next steps:
- Locate the Clients section on the sidebar and click on it.
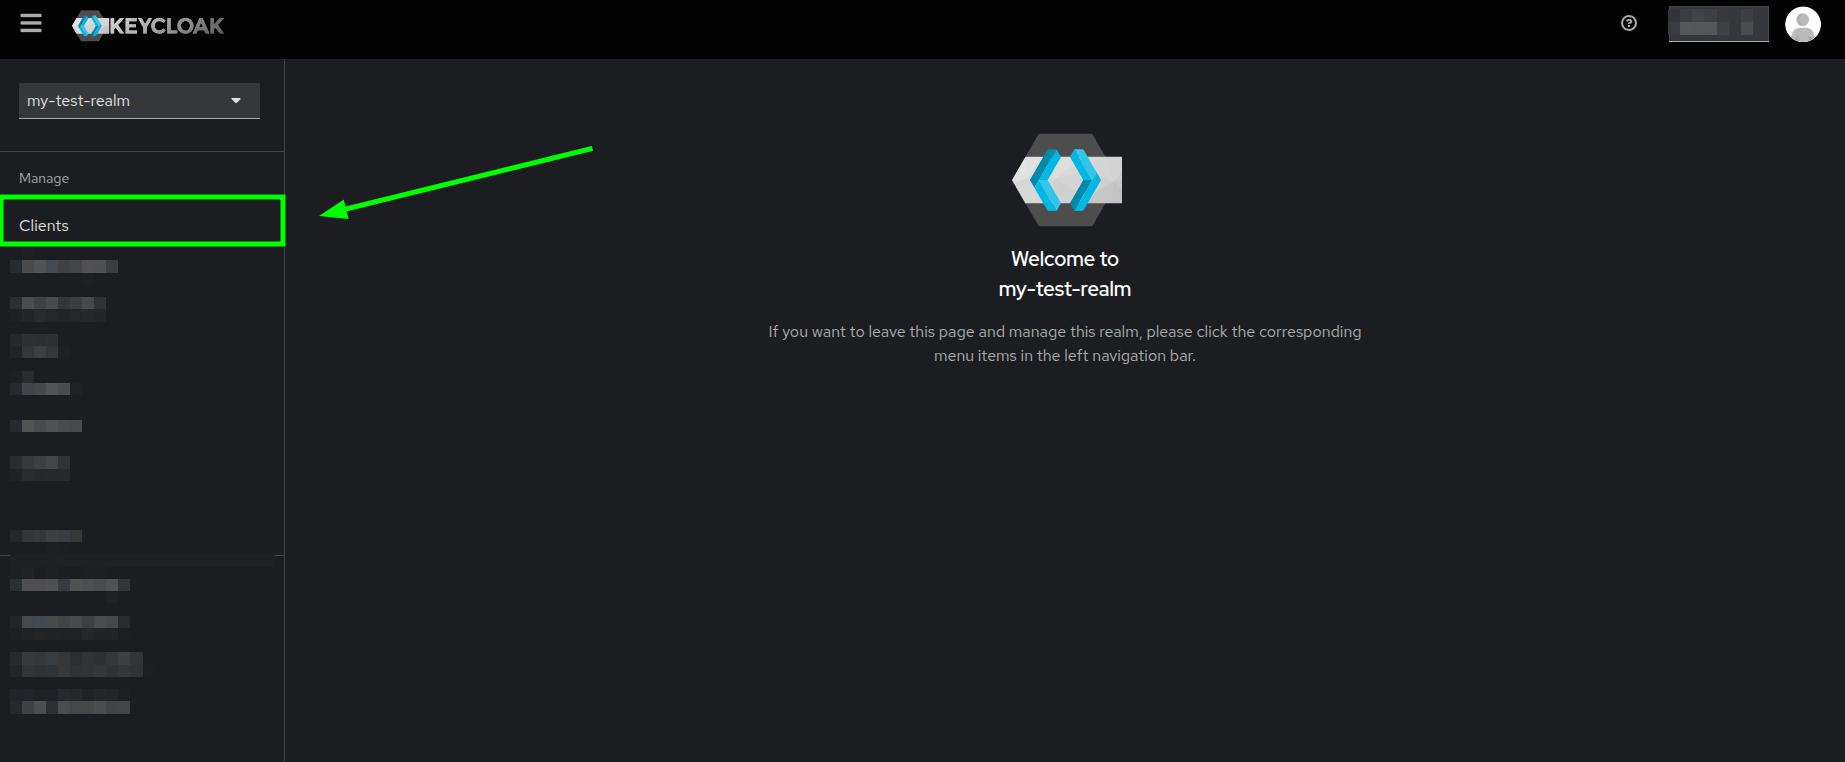
Keycloak's welcome page highlighting the Clients section - You will now see the Clients list tab within the Clients section. Go ahead and click on the Create client button.
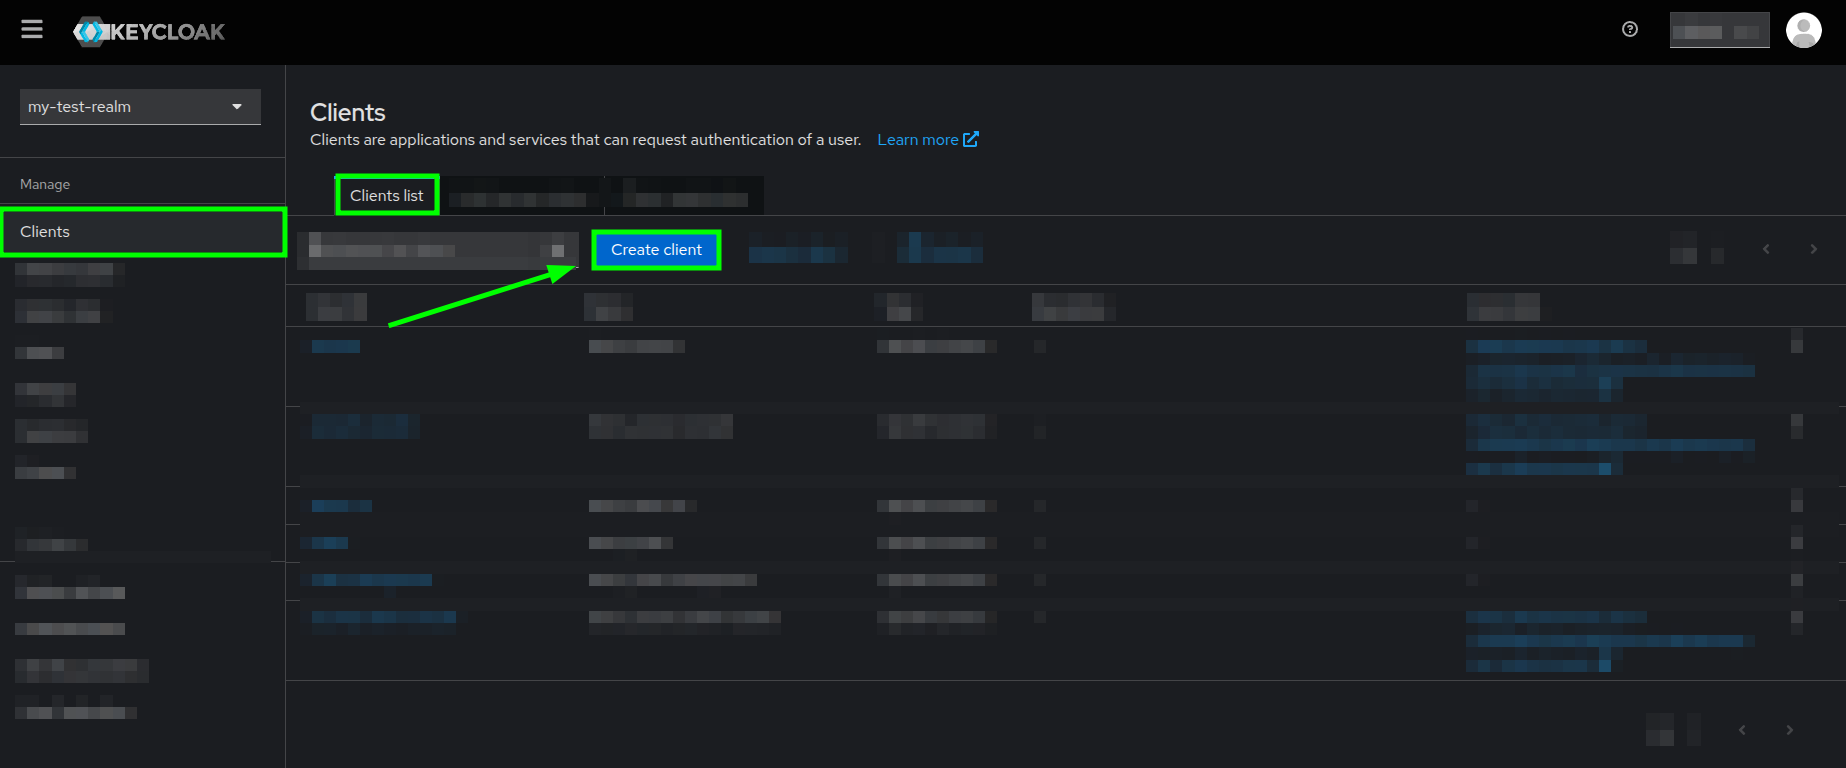
Clients list view highlighting the Create client button - You will now see the Create client form, which is split into 3 sections:
- In the General settings section, do the following:
- Make sure that the
Client typeis set to OpenID Connect - The
Client IDproperty is the only field which input is mandatory. You can decide whether you enter data toNameandDescriptionrespectively - After setting values to the fields, click on the Next button
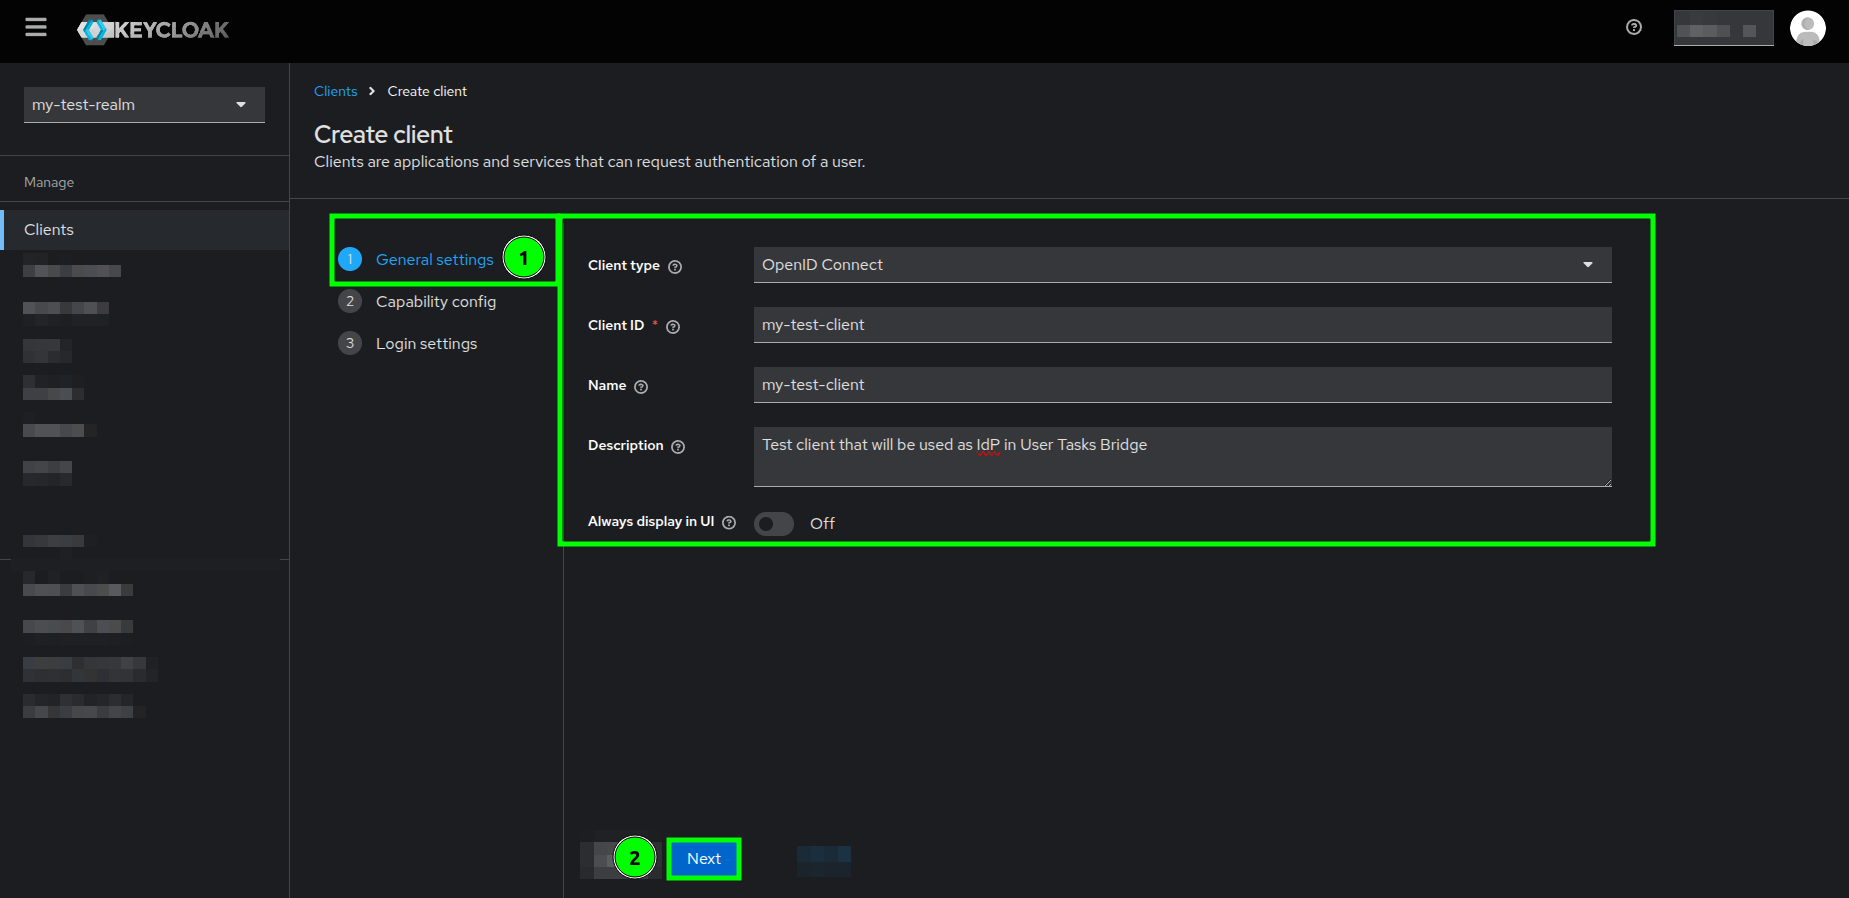
Create client form highlighting the General settings section
- Make sure that the
- In the Capability config section, do the following:
- Make sure that the Standard flow and Direct access grants are checked
- Do not enable/turn on any of the other options
- Click on the Next button
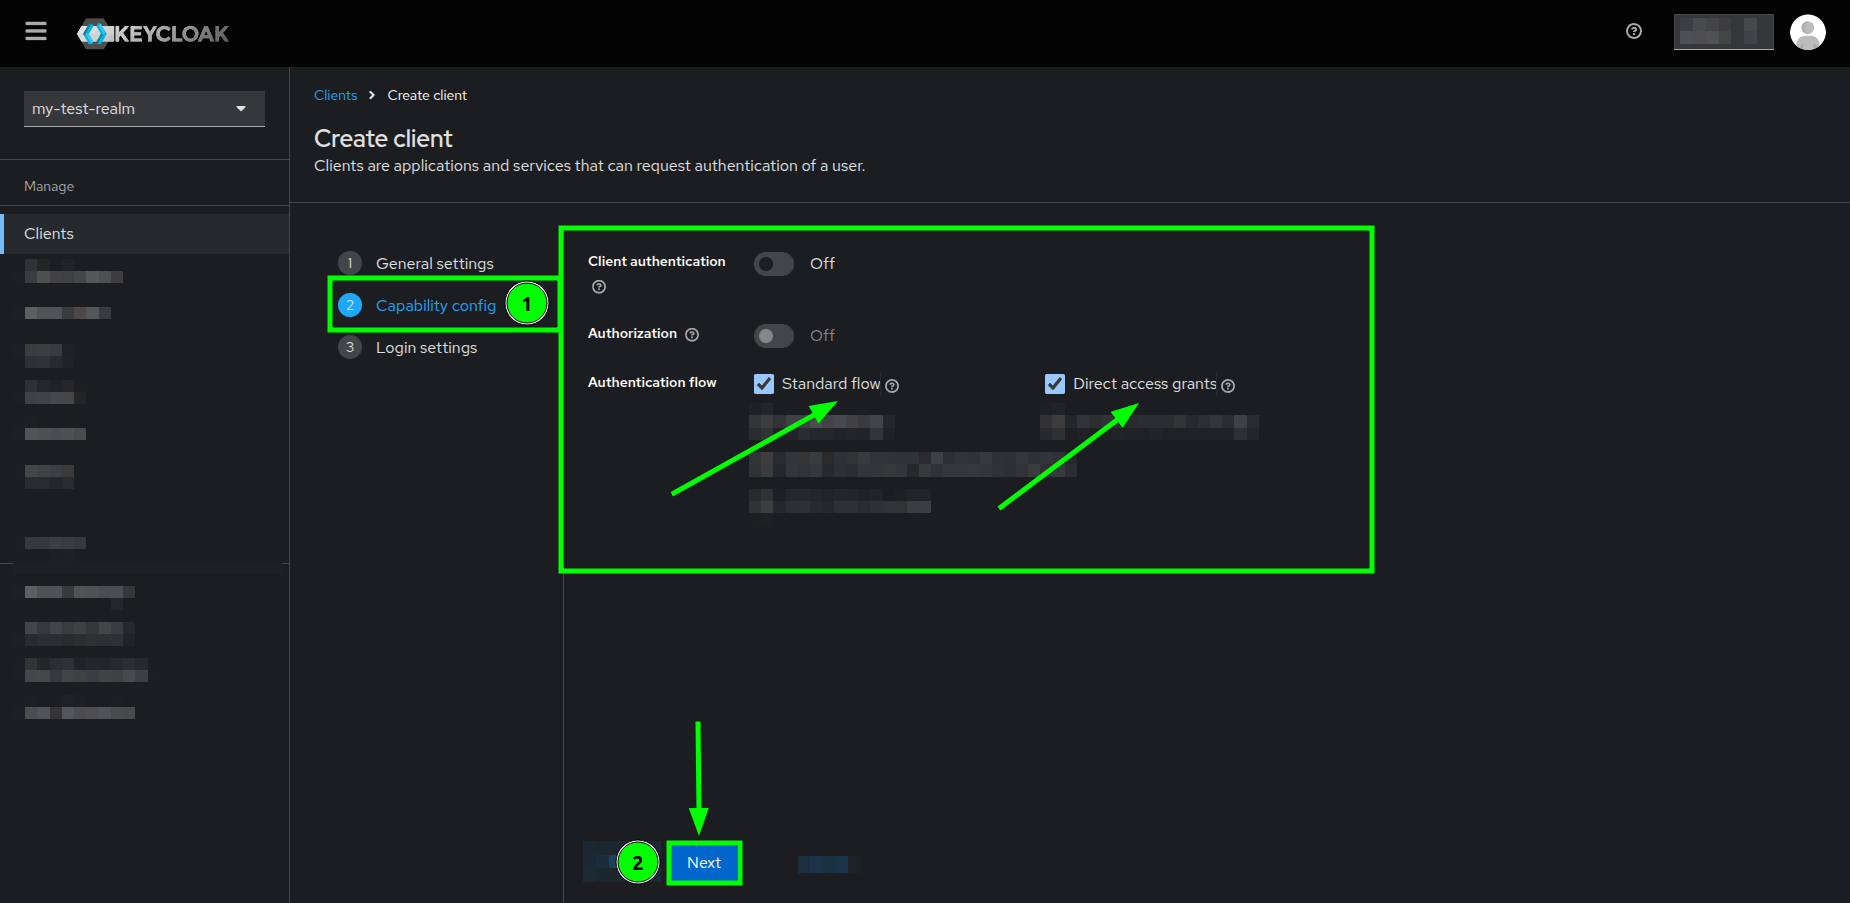
Create client form highlighting the Capability config section
- As per the Login settings section, you can configure it later, as those settings are not mandatory in order to integrate Keycloak with User Tasks Bridge Backend, so just click on the Save button.
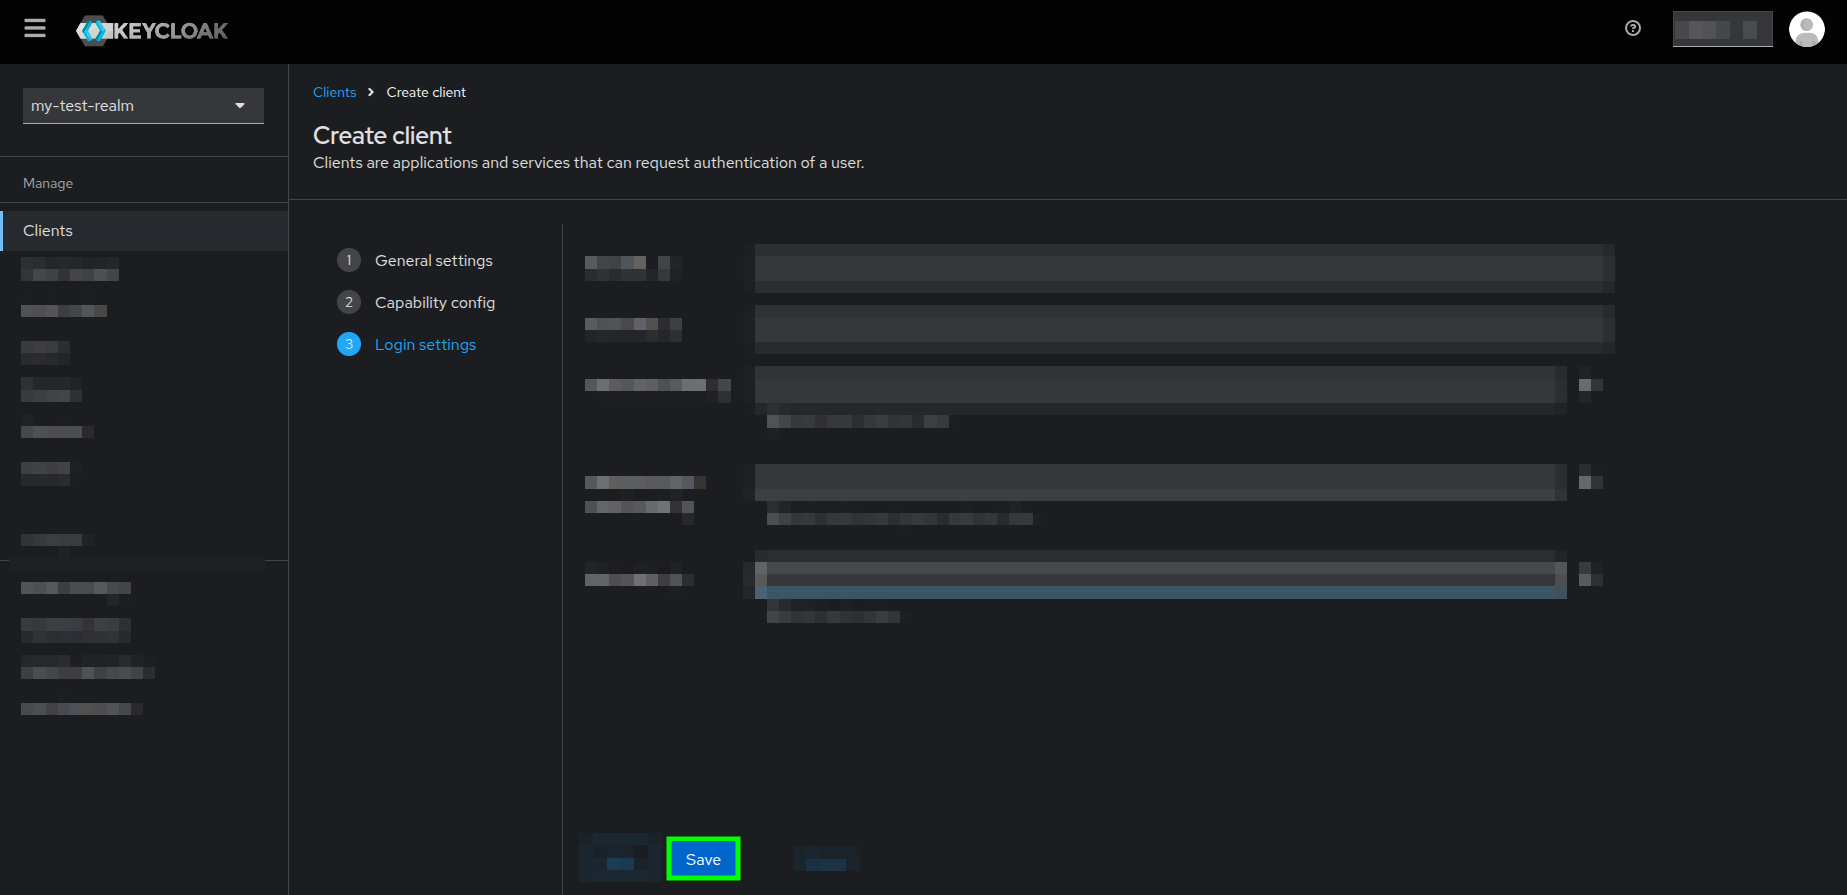
Create client form highlighting the Save button of the Login settings section - There you go. You created an OIDC client!
- In the General settings section, do the following:
Mandatory Claim creation
The User Tasks Bridge Backend requires a mandatory claim to be present in ALL access tokens issued by Keycloak.
Here are the steps to create such claim:
- In the Clients section, go to the Clients list tab and click on your client's name.
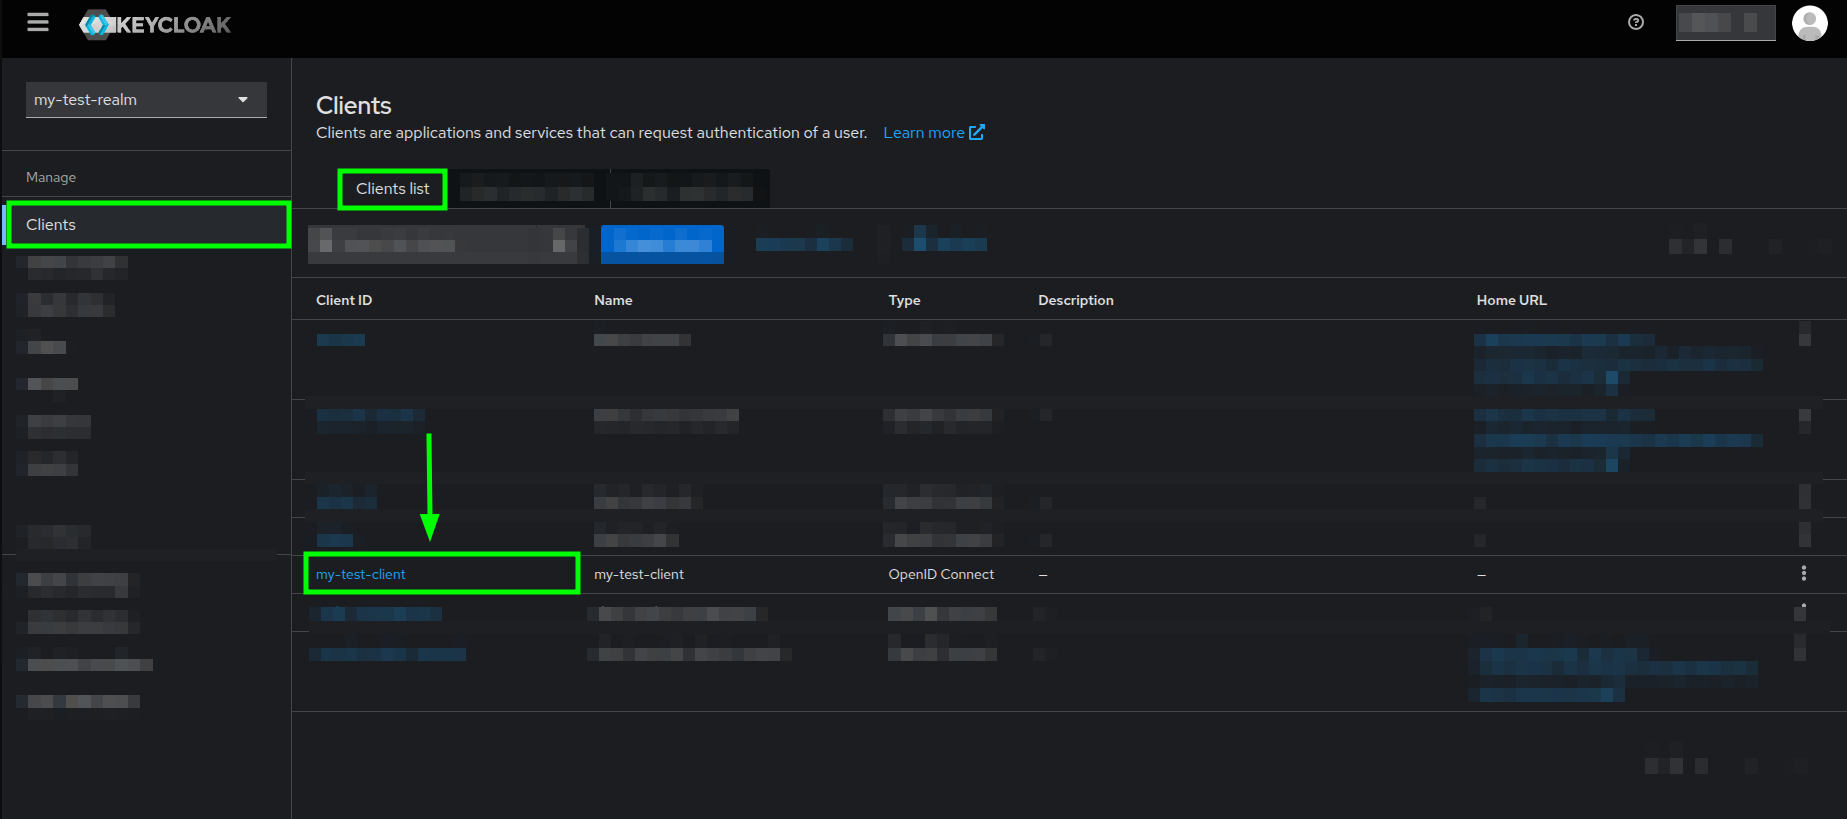
Clients list view highlighting your client's name - Once you are in your client's details view, go to the Client scopes tab.
- You will see a list of scopes, click on the one that is your client's name + dedicated.
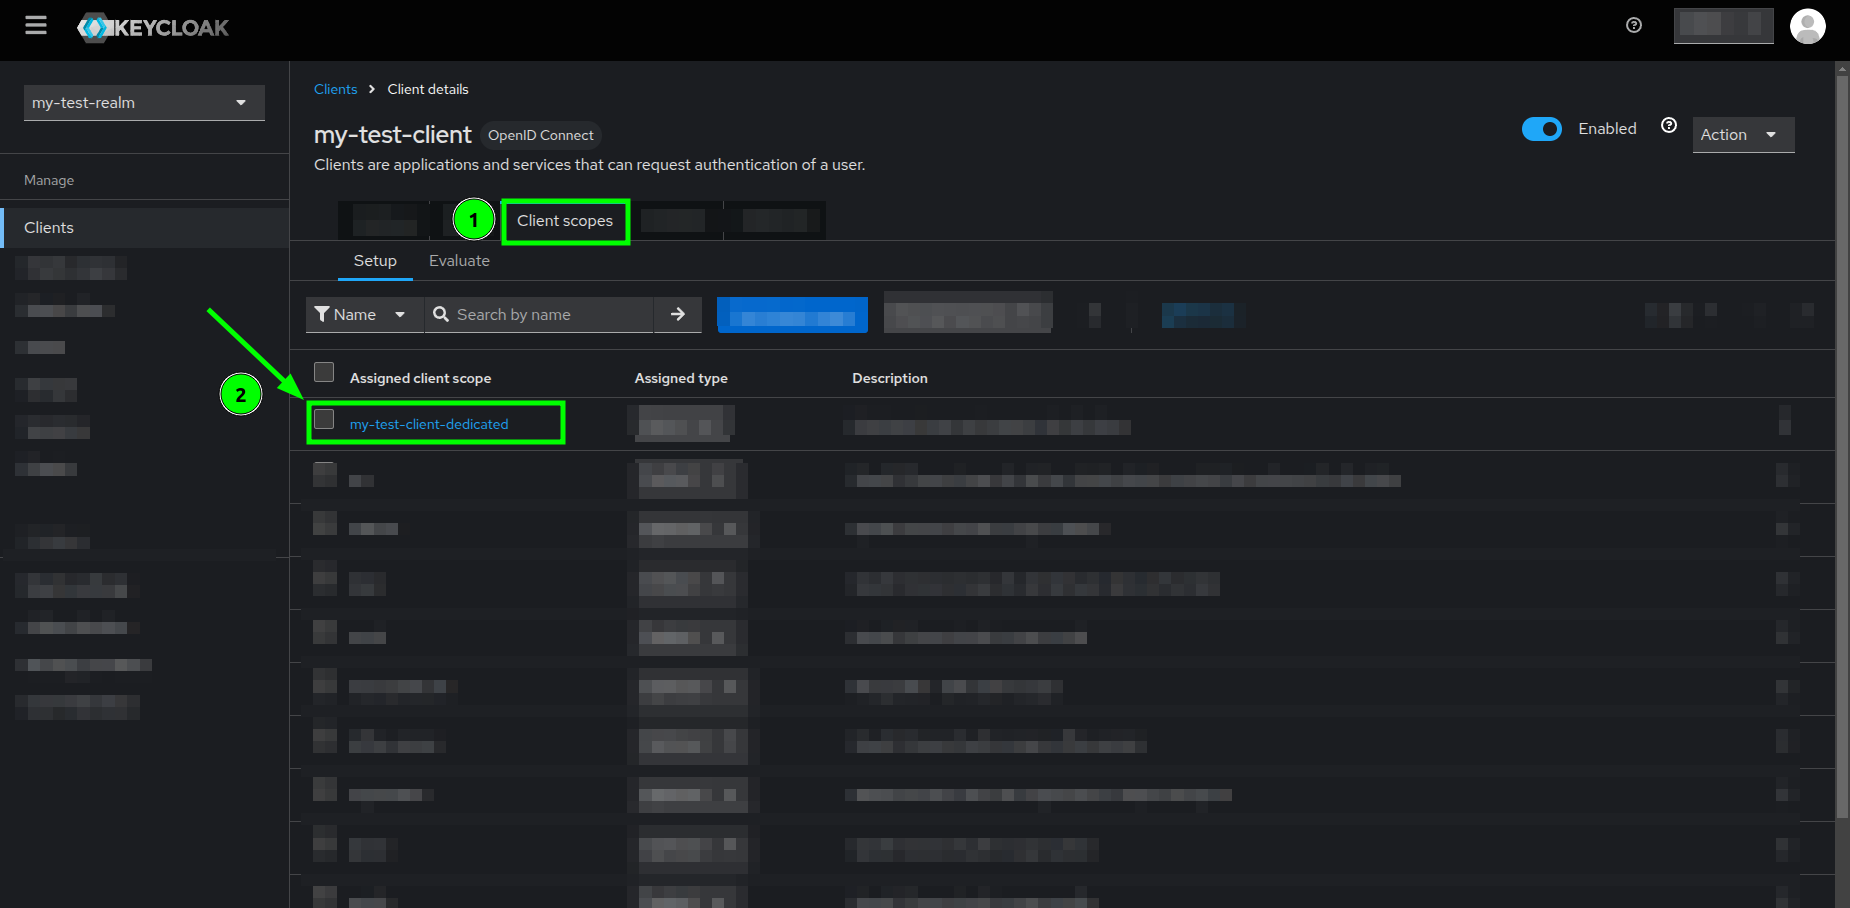
Client details view highlighting the Client scopes tab and the dedicated scope - You will see the Dedicated scopes view, go ahead and click on the Configure a new mapper button.
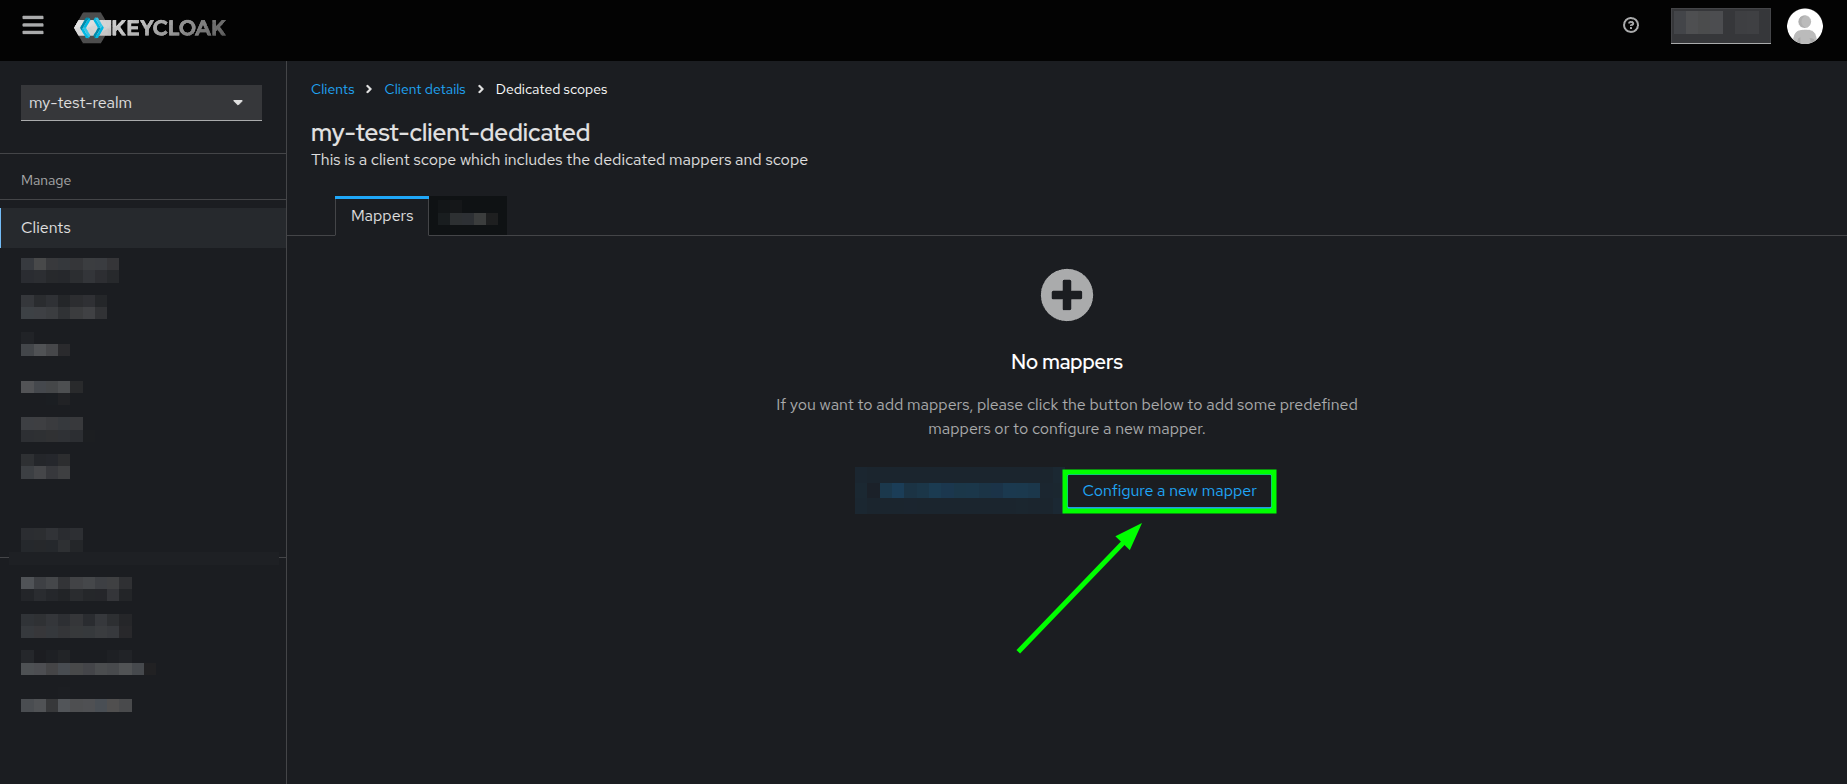
Dedicated scopes view highlighting the Configure a new mapper button - A popup Configure a new mapper dialog should appear, you will see a list of mappings.
- You must choose the Hardcoded claim mapping.
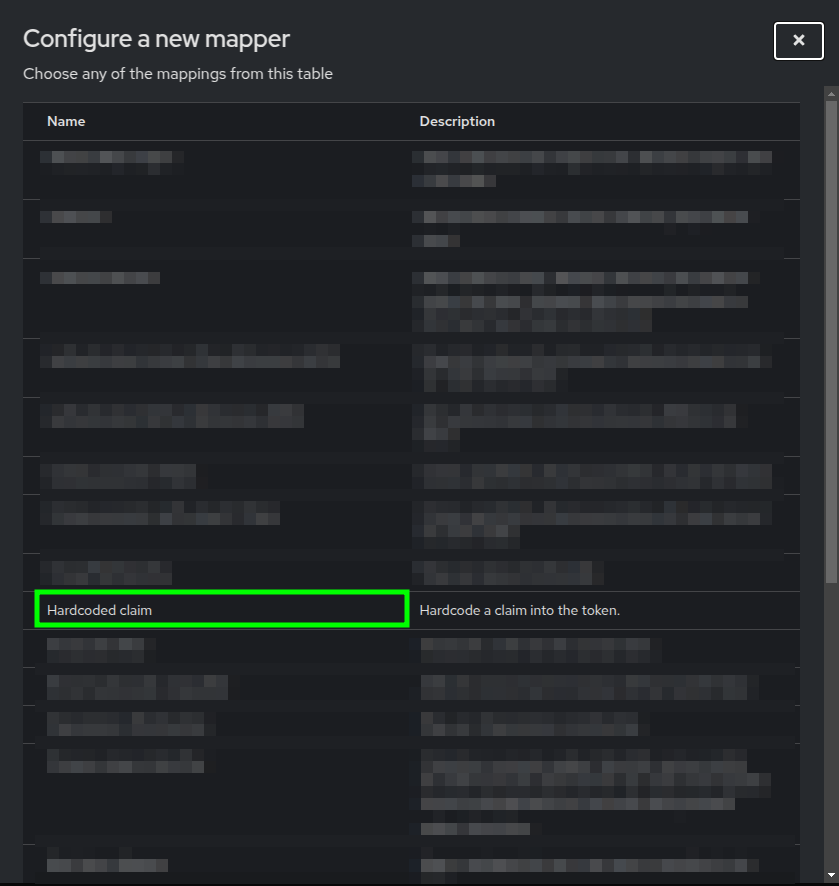
Popup dialog with a list of mappings highlighting the Hardcoded claim mapping - You will see the Add mapper form. Here you need to do the following:
- The
Namefield MUST be set to allowed_tenant - The
Token Claim Namefield MUST be set to allowed_tenant - The
Claim valuefield MUST be set to your tenant id in LittleHorse Kernel - The
Claim JSON Typefield MUST be set to String - Make sure that at least the Add to ID token and Add to access token properties are ON
- Click on the Save button
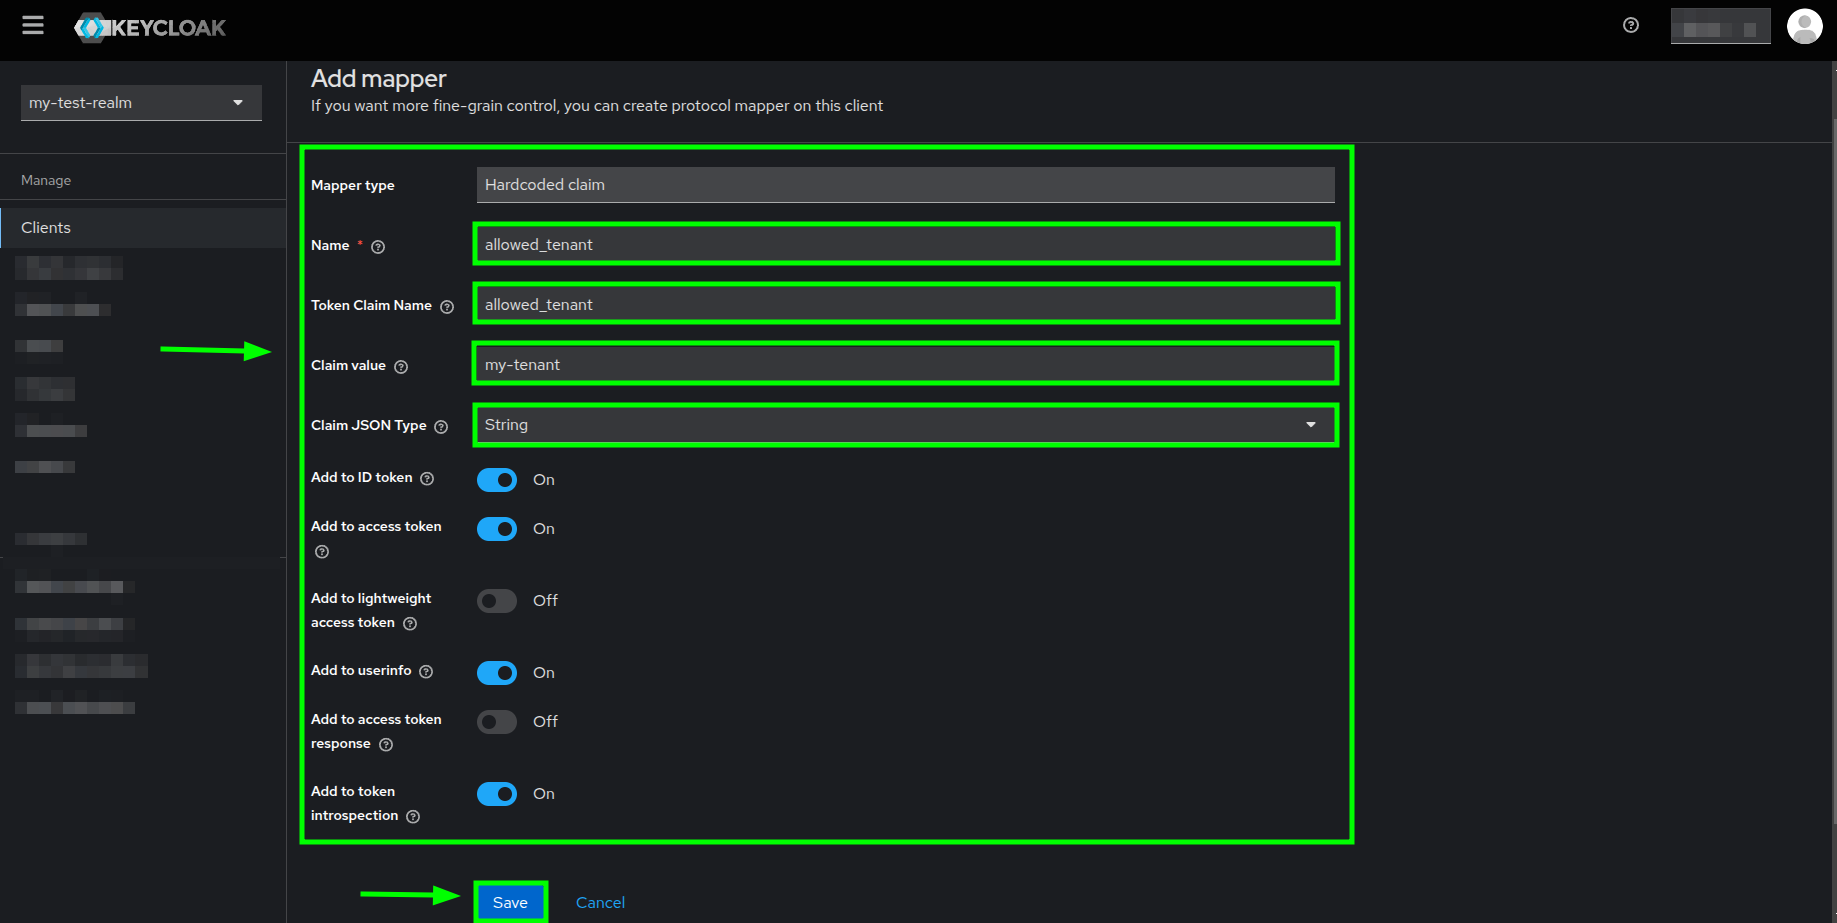
Add mapper form highlighting the required fields and the Save button - If the mapper creation is successful, then you should see your mapper in the list of existing mappers within the Dedicated scopes
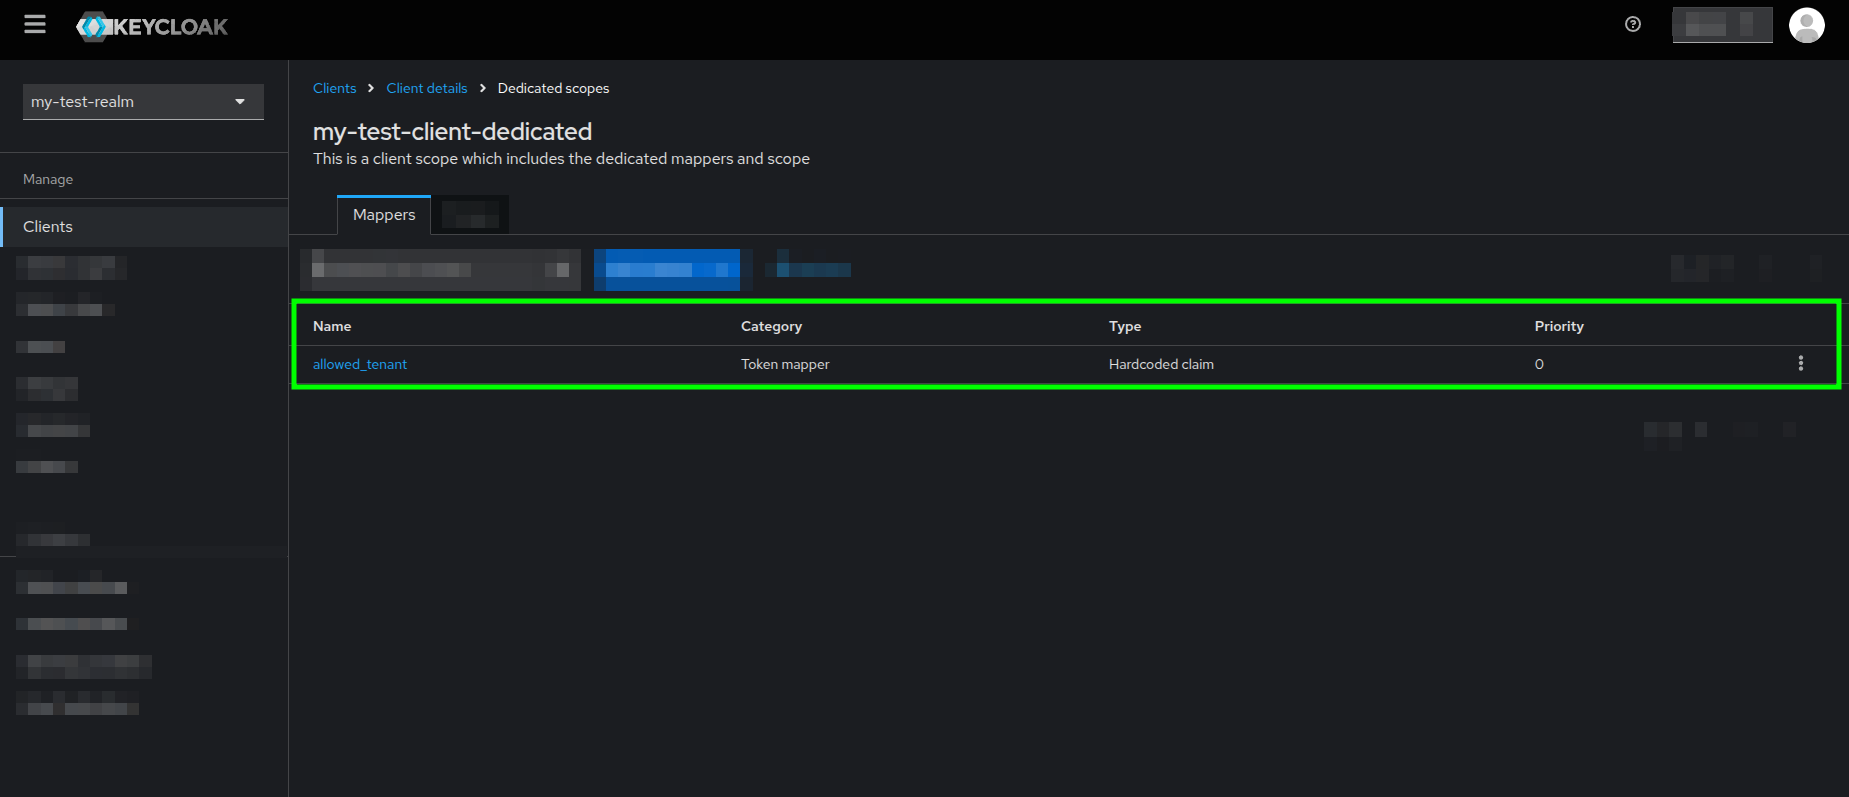
Dedicated scopes view highlighting the created allowed_tenant mapper in the Mappers tab
- The
- You have successfully created the allowed_tenant claim!
Regardless of your user being authorized and authenticated, if the allowed_tenant claim is not present in the issued access token, you will get an error when sending HTTP requests to the User Tasks Bridge Backend.
Roles Assignment
When it comes to your users, tt does not matter whether they are Admin or Standard users, all users MUST have the view-users role assigned to them. Otherwise, the User Tasks Bridge Backend will throw an error when trying to fetch user or group information from Keycloak.
You can assign the view-role to your users just like this:
- Go to the Users section and click on the user that you want to assign a role to.
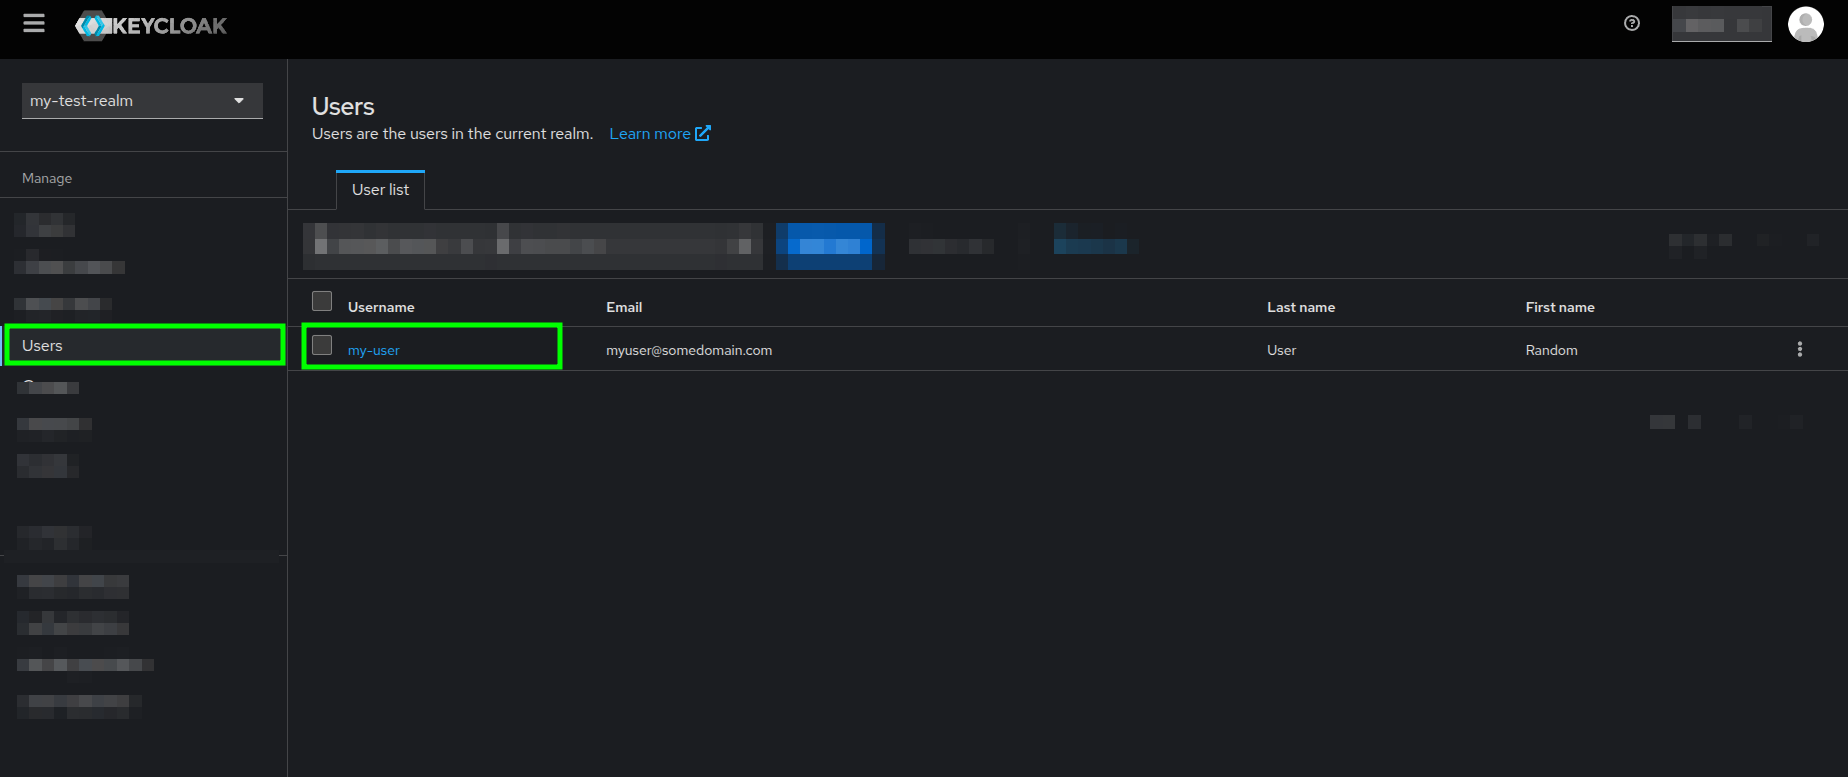
Users view highlighting a username - In your User's details page, go to the Role mapping tab, and click on the Assign role button.
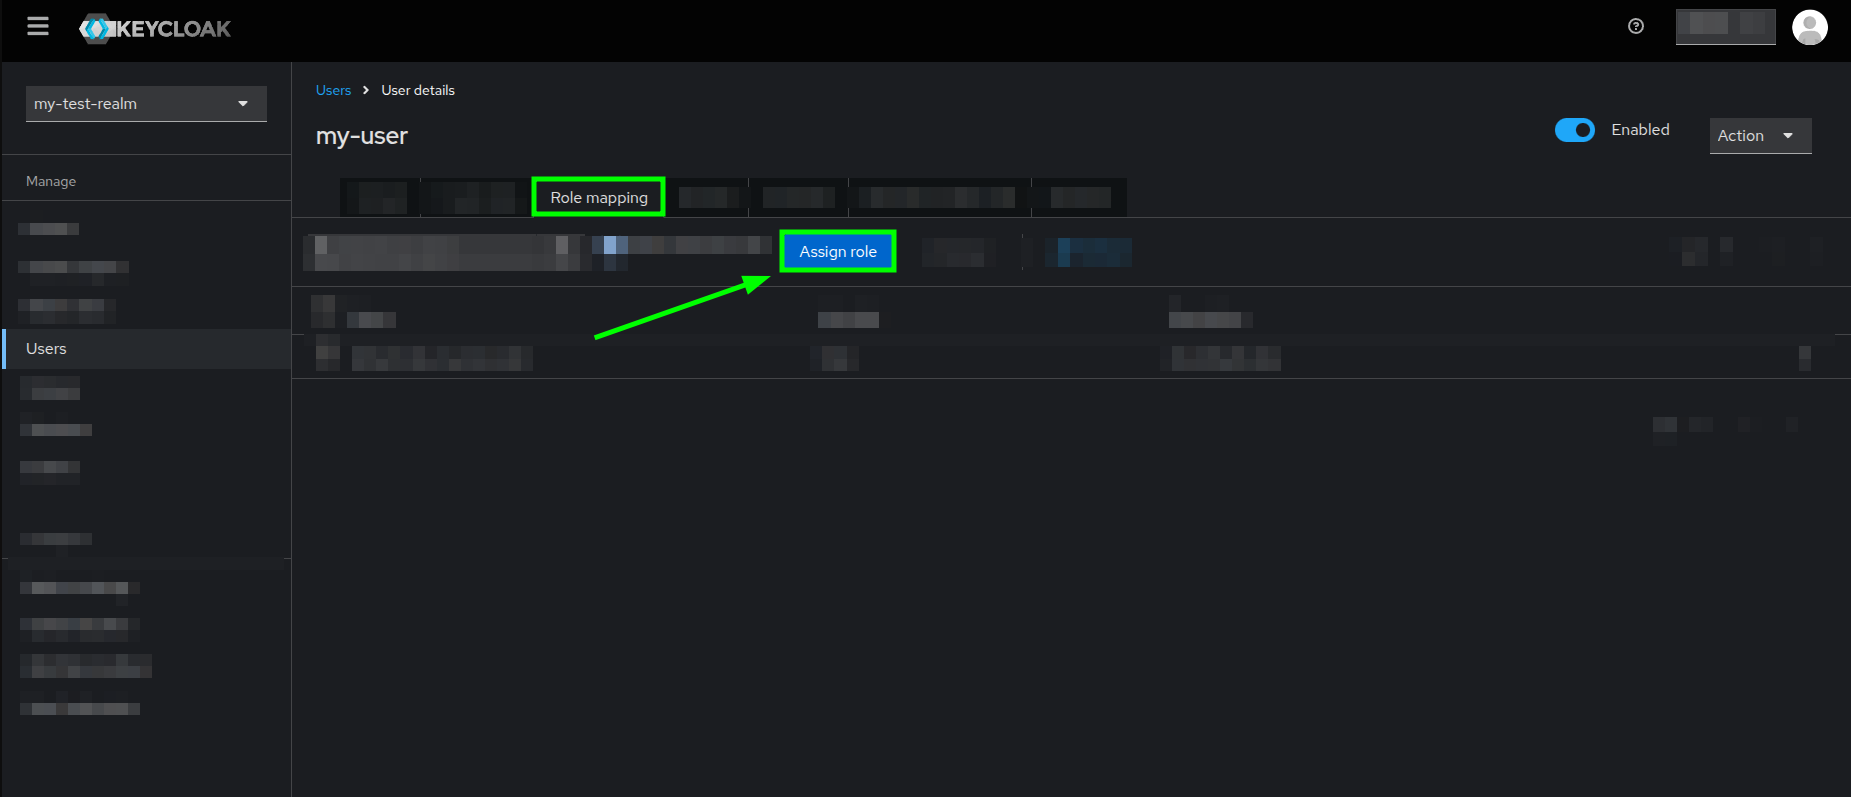
User details view highlighting the Role mapping tab and Assign role button - In the Assign roles popup dialog, locate the search bar and look for the view-users role from the realm-management client
- Select it by checking the box before it, and click on the Assign button.
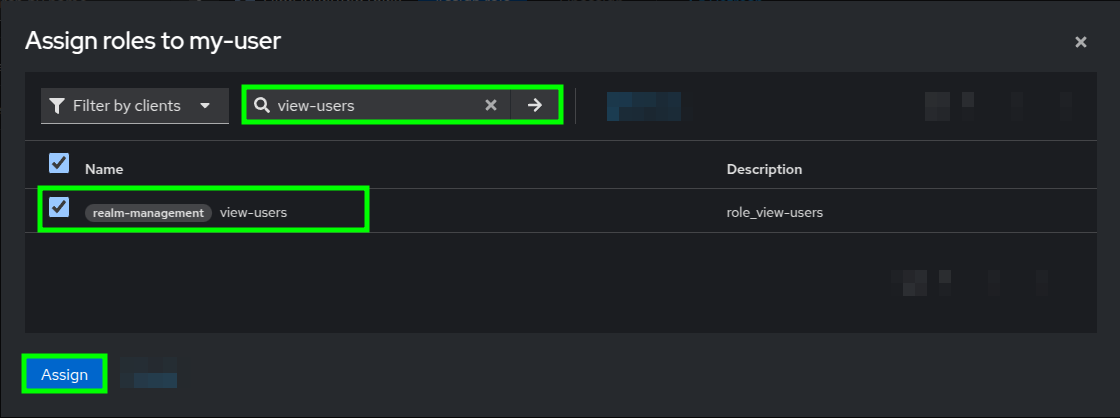
Assign roles popup dialog highlighting the search bar and the selected view-users role - And with that, you have successfully assigned the mandatory role to your user!
Remember that ALL of your users MUST have assigned at least the view-users role.
Admin Role creation
There are two types of users in User Tasks Bridge Backend, Standard and Admin, and if you want to make a user have Admin privileges, you first need to create the Admin role, unless you have a very good reason for not wanting to use the Admin features that the User Tasks Bridge Backend has to offer (Spoiler Alert: You will be missing out big time!).
Since you do not want to miss out the Admin features, follow the next steps:
- From your client's Client details view, go to the Roles tab.
- Click on the Create role button.
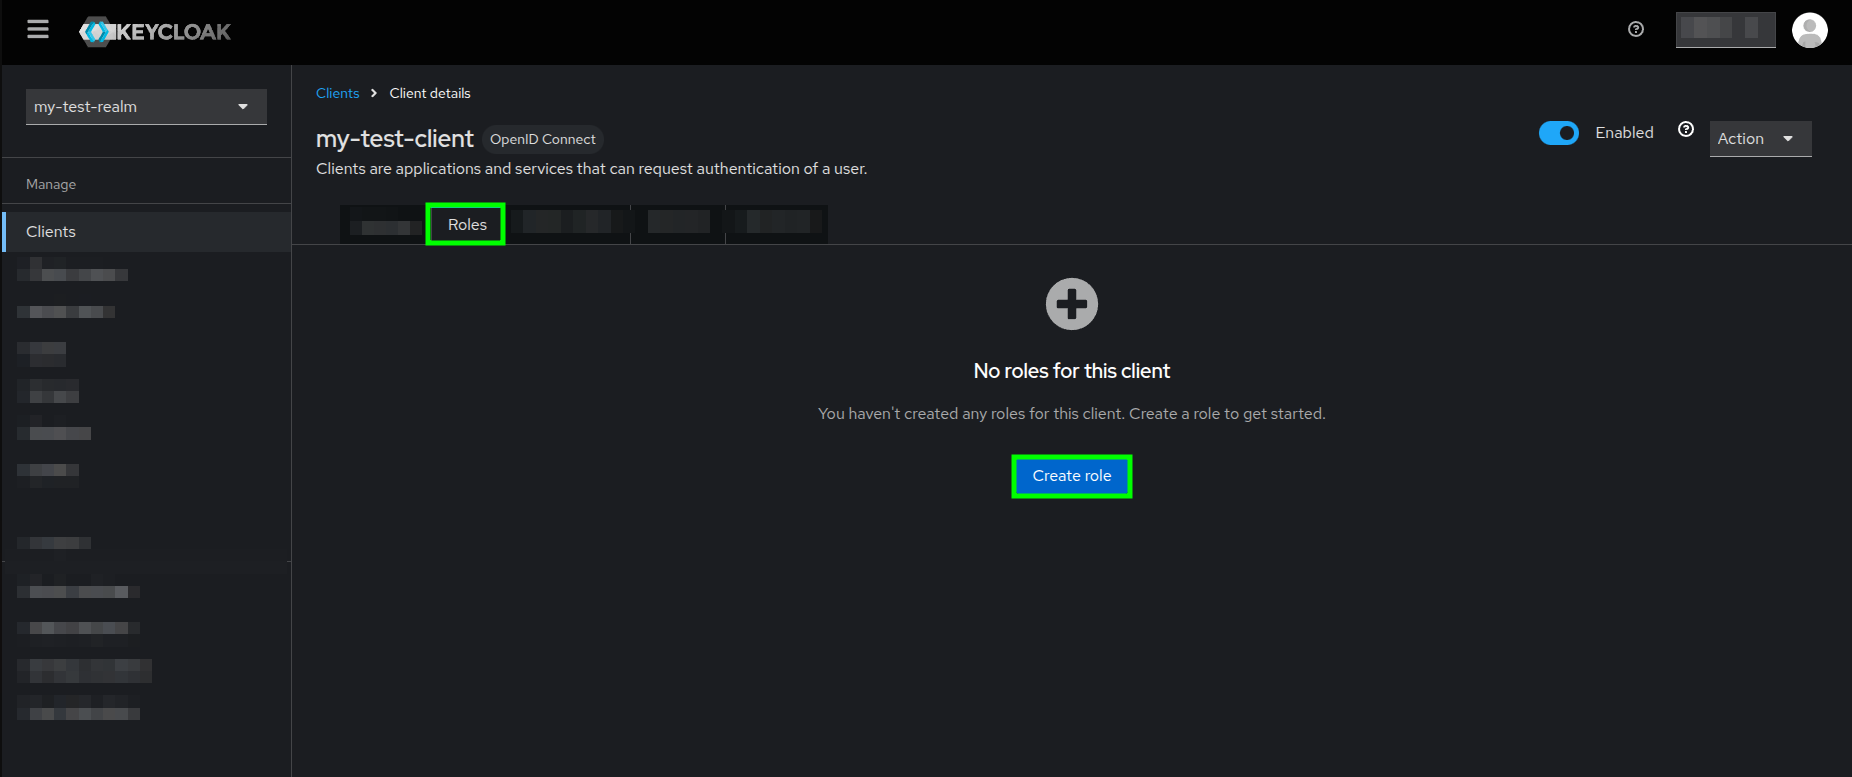
Client details view highlighting the Create role button in the Roles tab - You will see the Create role form where you just need fill in the
Role namewith the value as lh-user-tasks-admin and click on the Save button.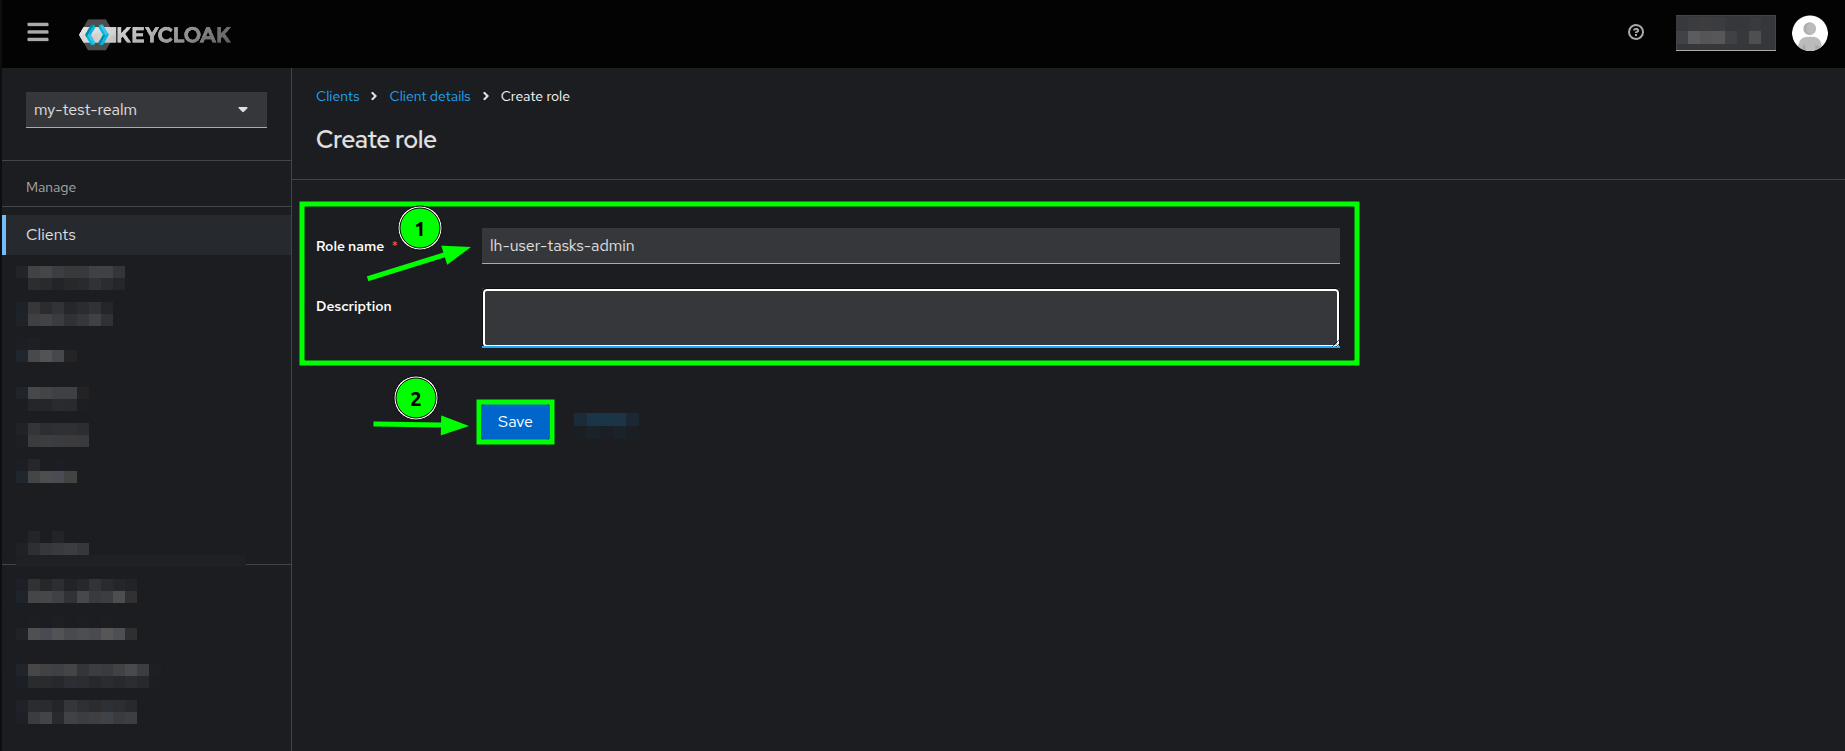
Create role form highlighting the Role name field and Save button - If the role creation is successful, then you should see the Role details view as follows:
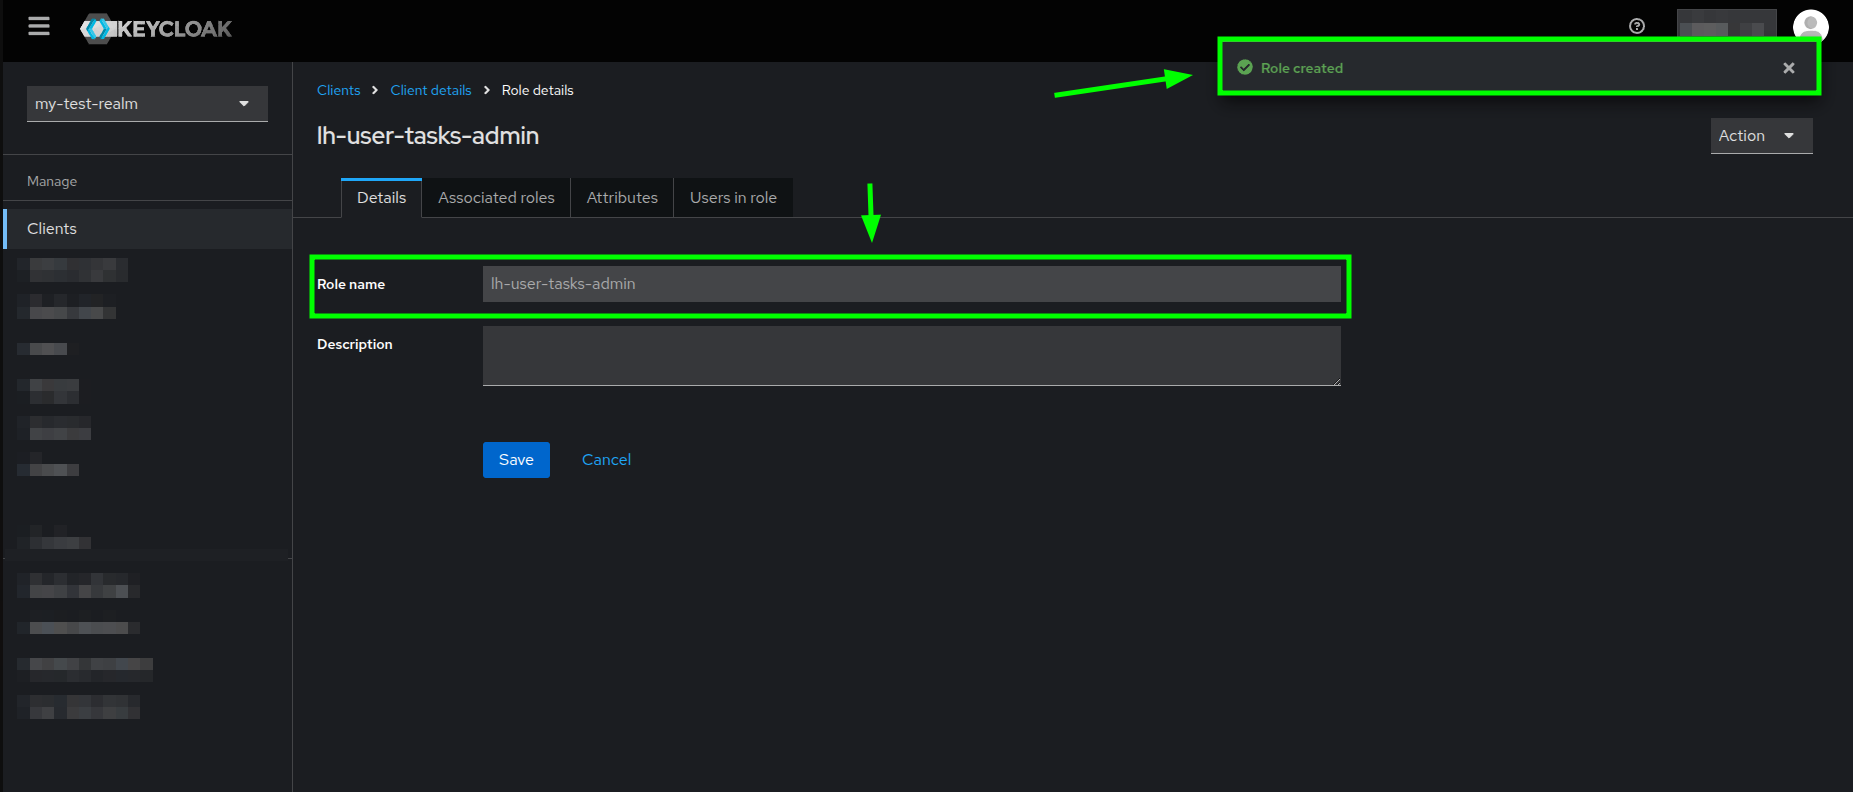
Role details view highlighting the read-only role name and successful creation message
Once the lh-user-tasks-admin role is created, you can replicate what you already did with the view-users role and assign the admin role to your users, which in summary was something like this:
- From your user's Role mapping tab, click on the Assign role button, and in the Assign roles popup search for and select the lh-user-tasks-admin role.
- Click on the Assign button.
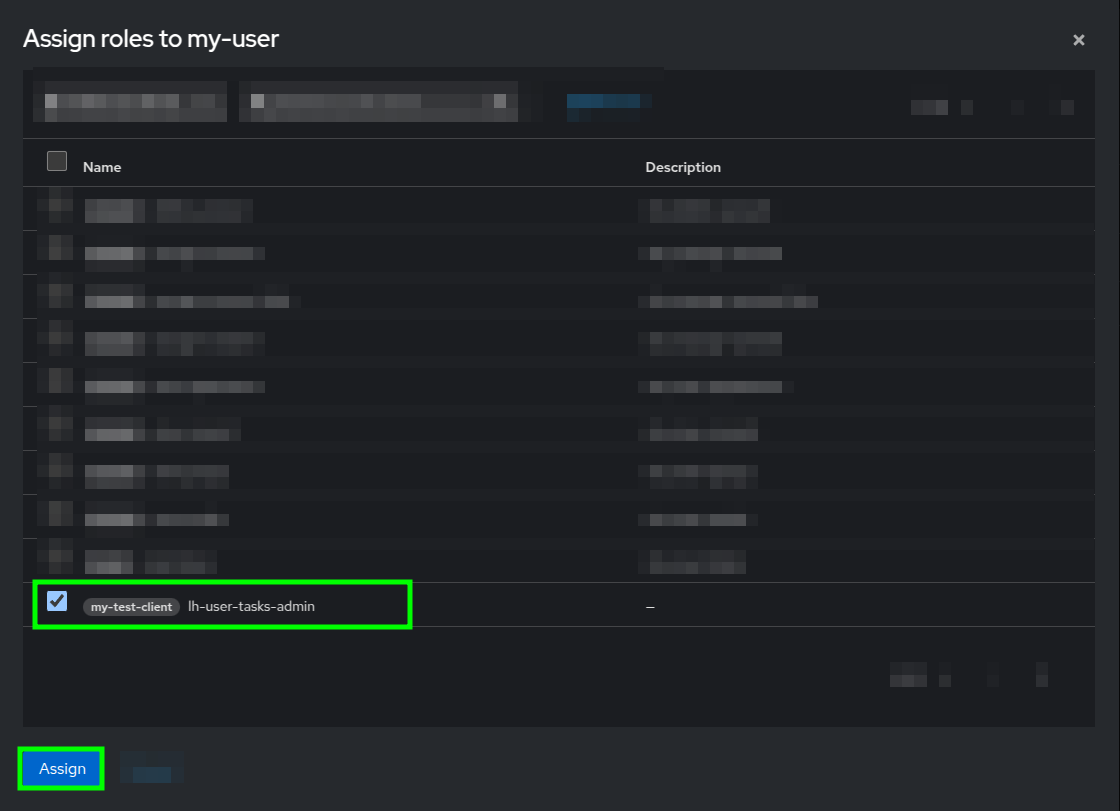
Assign roles popup dialog highlighting the selected lh-user-tasks-admin role
In the end, your Admin users Role mapping view should have the previously discussed roles and look like this:
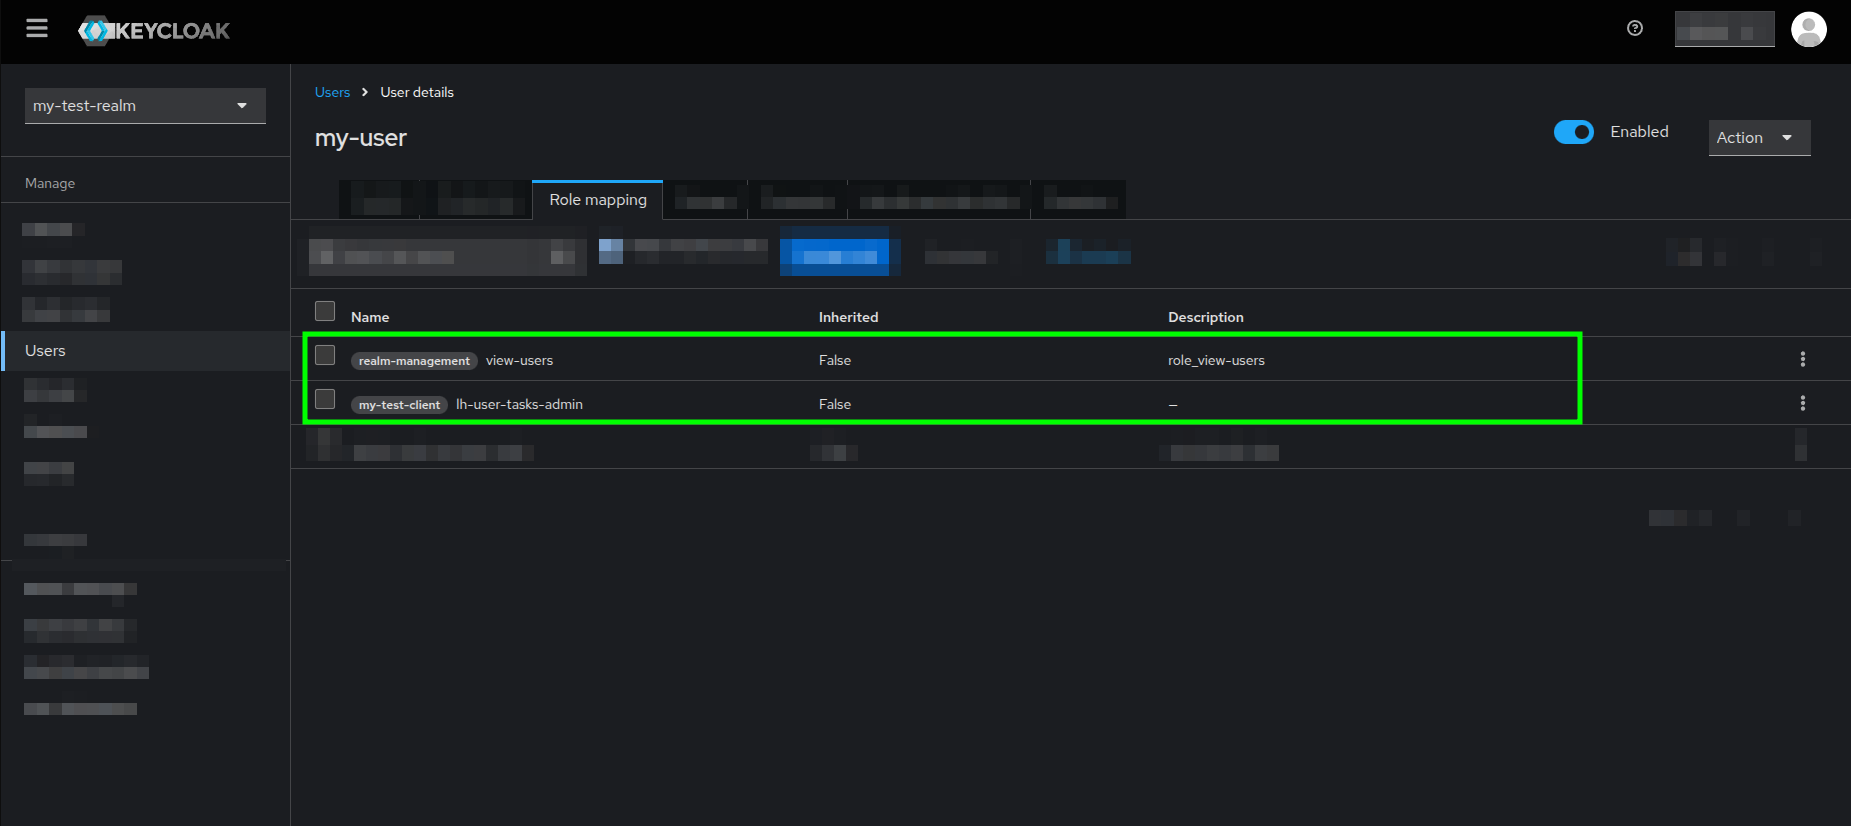
User Tasks Bridge Backend Settings
Make sure that you edit the oidc-properties.yml file located within the ./config/ directory.
Example
com:
  c4-soft:
    springaddons:
      oidc:
        ops:
          - iss: https://<your-keycloak-server>/realms/<your-realm>
            label-name: Default Keycloak
            username-claim: preferred_username
            user-id-claim: EMAIL
            authorities:
              - path: $.realm_access.roles
              - path: $.resource_access.*.roles
            vendor: keycloak
            tenant-id: <your-tenant-id-in-littlehorse>
            client-id-claim: azp
            clients:
              - <your-keycloak-client>
Configuration Fields Explained
iss: Your Keycloak realm URL. Format:https://<keycloak-server>/realms/<realm-name>label-name: The value of this property will be used to set a label in the login view. You can set something like "Default Keycloak".username-claim: In Keycloak, this is typicallypreferred_usernameuser-id-claim: This property is used to set the value of userId when performing assignments. It needs to be one of the following values:EMAIL,PREFERRED_USERNAME,SUB.authorities: Tipically, there are 2 places in which Keycloak sets roles, and you can set both within the authorities property. For example: $.realm_access.roles or $.resource_access.*.roles.vendor: Must be set tokeycloaktenant-id: This is your LittleHorse tenant IDclient-id-claim: Useazp(Authorized Party) for Keycloakclients: List of authorized client IDs that can access the User Tasks Bridge
If you have all properties correctly set, then you are ready to use access tokens from Keycloak to send your requests to the User Tasks Bridge Backend.
Additional Resources
In case that you want to automate this configuration process and make it more efficient, you can do all of the Keycloak-related configurations through its Admin REST API just as well.